

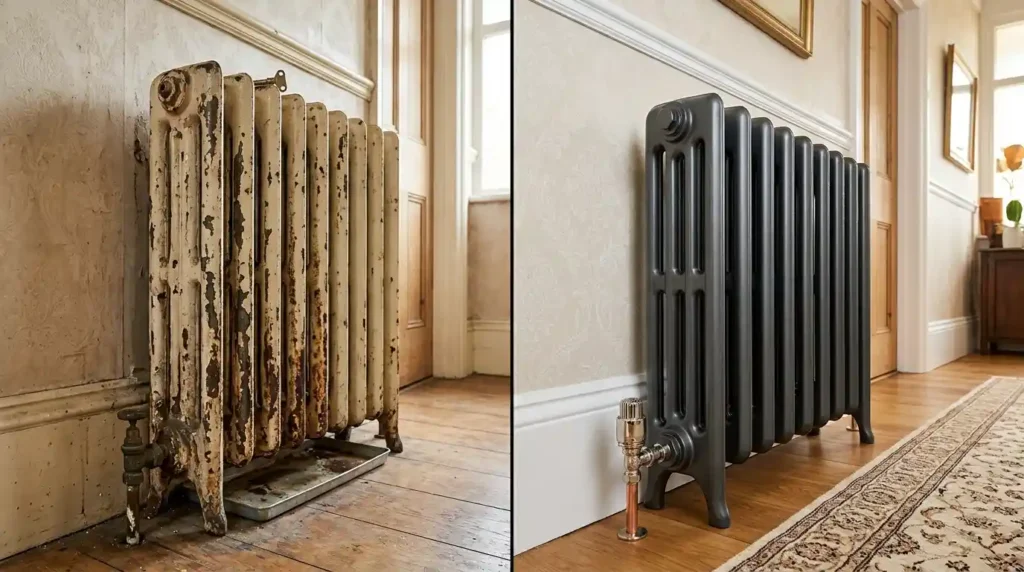
There is a cast iron radiator in the hallway of a Victorian terraced house in Leeds that has been there since 1923. It still heats the hallway. It still looks right in the space the column profile, the weight, the slightly warm smell of old paint when the heating first comes on in October. The current owner asked a heating engineer whether it needed replacing. The engineer looked at it for about thirty seconds and said no. What it needed was bleeding, a chemical flush of the system, fresh paint, and a new thermostatic radiator valve. Total cost: under £200. A replacement panel radiator would have cost £400 installed and would have looked like a surrender.
That gap between what a period radiator costs to restore and what it costs to replace, and between what restoration delivers aesthetically versus what a new panel delivers is the heart of a comprehensive guide radiator restoration middleclasshomes actually requires. Not the five-step summary. The full reasoning behind each decision, including the ones that most DIY guides skip because they assume either too much knowledge or not enough patience.
Diagnosing What You Actually Have Before Touching Anything
The restoration process starts with honest assessment, and the first thing to assess is whether the radiator is worth restoring at all. That sounds blunt but it saves significant time and money. The distinction between a radiator that will respond well to restoration and one that won’t comes down to where the problem sits external or internal, cosmetic or structural.
External rust on a cast iron radiator is almost always addressable. Surface rust on the columns, chipped paint, old layers of cream or white gloss built up over decades these are surface problems that sandblasting, wire brushing, rust treatment, and repainting resolve completely. External rust that has produced pitting deep enough to compromise the metal surface is a harder call, but even significant external pitting on cast iron rarely indicates structural failure.
Internal rust and magnetite deposits are the more serious diagnosis. The two indicators that point there: the radiator runs cool or shows patchy heat at the bottom when the heating is on, or it shows cold spots across the surface despite the valves being fully open. When the heating is off, bleeding the radiator using a radiator key with a small container in hand along with an old towel — opening the bleed valve and allowing the water to run for a few seconds reveals whether internal corrosion is present. Black or dark brown water indicates magnetite sludge circulating in the system. Clear water with some discolouration is less concerning.
The third diagnostic is the chassis leak water appearing from the body of the radiator rather than from the connection points. If a radiator is leaking from the chassis rather than the connection points, the only real reason it would rupture is corrosion, and in that case the radiator needs replacing rather than restoring. That is the clean line between restoration and replacement: a leaking chassis means the metal integrity is compromised and no amount of surface work resolves it.
Where the diagnosis points to internal sludge without chassis failure, a powerflush or chemical flush addresses the problem before any surface restoration begins. A powerflush costs £300 to £500 for a typical UK heating system and should be carried out by a Gas Safe engineer it forces high-velocity water and cleaning chemicals through the entire circuit, breaking up magnetite deposits and sludge that have reduced heat output across every radiator in the system. Installing a magnetic filter such as a Fernox filter at the same time captures future debris before it recirculates. Adding a corrosion inhibitor and system antifreeze additive after the flush extends the interval before the problem returns.
The Surface Restoration Sequence That Most DIY Guides Compress Into One Step
Once the internal system is addressed and the radiator has been confirmed as structurally sound, surface restoration follows a sequence that is not difficult but is unforgiving of shortcuts. The sequence is: drain, disconnect, remove, strip, treat, prime, paint, reinstall, balance.
Draining the radiator means shutting off both the lockshield valve and the thermostatic radiator valve before disconnecting. Place a drain tray and bucket beneath the connections before loosening anything even a drained radiator holds residual water. Disconnect the radiator from the pipes using an adjustable spanner, keeping PTFE tape ready for reinstallation threads. Cast iron column radiators are heavy a six-section 1930s cast iron radiator weighs between 40 and 80 kilograms depending on configuration. Getting it off the wall brackets and to the working area is a two-person job without exception.
Stripping the old paint is where the surface restoration quality gets determined. Wire brushing removes loose and flaking material. An angle grinder with a wire wheel attachment handles heavier rust and built-up paint layers on column sections. Hand sanding with progressively finer sandpaper grits removes the residue and keys the surface for primer adhesion. Chemical stripper works on heavily built-up layers where mechanical removal risks damaging the casting detail on ornamental Victorian or Edwardian radiators apply, leave, and remove rather than scrubbing. The goal at this stage is bare, clean metal with no remaining rust, no old paint, and no grease or surface contamination.
Rust converter treatment goes onto any remaining rust spots after mechanical removal it chemically converts iron oxide into a stable compound that can be painted over directly. Apply rust inhibitor primer immediately after, before any atmospheric moisture contacts the bare metal. Metal primer designed specifically for radiators is not optional here. Using the wrong type of primer or applying it incorrectly causes paint adhesion failure make sure you use a metal primer designed for radiators and apply it evenly, allowing it to dry completely.
Radiator paint is heat-resistant paint formulated to withstand the surface temperatures a working radiator reaches standard wall paint cracks, yellows, and smells when applied to a radiator. Specialist radiator enamel, heat-resistant topcoat, or professional spray finish from brands whose work has been licensed by Little Greene, Farrow and Ball, or Benjamin Moore gives period radiators the finish quality their casting deserves. Brushed finish, polished finish, satin, gloss, matte, metallic the choice should reference the room and the radiator profile. A flat satin white works on a standard column in a period living room. Anthracite grey, brushed chrome, or old gold finishes elevate a statement radiator in a hallway or kitchen to architectural detail rather than heating infrastructure.
Paint bubbling is usually caused by applying paint to a surface that is still wet or has some kind of residue make sure the radiator is clean, dry, and free of any debris before priming and painting. If runs or drips appear, smooth even strokes and wipe up drips immediately, sanding down any runs before reapplying. Two thin coats outperform one thick coat across every radiator painting scenario.
Reinstallation, Valve Replacement and Balancing the System
Reinstallation reverses the removal sequence brackets back on the wall, radiator lifted onto brackets, pipe connections remade with fresh PTFE tape on all threads. Check every seal and valve during reinstallation. Replace any valve that looks worn, corroded, or stiff thermostatic radiator valve replacement costs £15 to £40 per valve depending on specification, and a stiff or failed TRV is frequently the reason a restored radiator underperforms against expectation. Corner valves, angled valves, and straight valves all serve the same function choose the configuration that matches the pipework approach angle.
Refill the system slowly and bleed the radiator to remove air. Check for leaks before turning the heating back on, and remember to balance your radiators after reinstallation to ensure even heat distribution throughout the home. Balancing means adjusting the lockshield valve on each radiator so that all radiators across the system reach working temperature at the same rate without balancing, radiators close to the boiler get most of the flow and radiators at the far end of the circuit run cooler regardless of how well they’ve been restored.
After bleeding the radiator, top up your boiler pressure level to somewhere between 1.0 and 1.5 bar when cold checking the manual for specifics, with 2 bar when hot being a typical gauge. A pressure drop after bleeding is normal and expected. A sustained pressure drop that recurs over days indicates a system leak that needs a qualified plumber or Gas Safe engineer before the heating season starts.
The Cost Calculation That Makes Restoration the Sensible Middle Class Homes Decision
The honest radiator restoration cost breakdown for a typical middleclasshomes project: DIY surface restoration — sandpaper, rust converter, primer, heat-resistant paint, new valves — runs £50 to £120 per radiator depending on size and finish specification. Professional sandblasting and repainting from a specialist radiator refurbishment service like Castrads or Paladin Radiators starts at £120 including VAT in the UK, with custom finish options adding to that. A full professional restoration including disassembly, internal cleaning with high-pressure water and specialist chemicals, rebuilding, and finishing starts at £700 in the US market through services like ECORAD, reaching £300 to £500 for mid-complexity UK restorations.
The comparison that matters most is against replacement. A new reproduction cast iron column radiator of equivalent size costs £400 to £900 depending on column count and finish. A modern double panel convector radiator covering the same BTU output costs £150 to £400 installed cheaper, less visually significant, and carrying none of the thermal mass benefits that make cast iron radiator heat retention distinctively comfortable. Cast iron holds heat and releases it slowly after the boiler cycles off. A panel radiator cools immediately. In a period property where the radiator is part of the architectural character of the room, that distinction carries genuine weight beyond nostalgia.
Peer-reviewed work carried out with Salford University shows that a refurbished cast iron radiator has a carbon footprint 95% lower than that of a new one which adds a sustainability dimension to the restoration vs replacement decision that sits well within the middleclasshomes approach to long-term home investment: spend carefully, maintain consistently, replace only when restoration genuinely cannot deliver the required outcome.
The heat pump compatibility question is increasingly relevant for UK homeowners under the Future Homes Standard trajectory. Cast iron radiators are well-suited to heat pump systems operating at lower flow temperatures their larger surface area and thermal mass compensate for the lower water temperature that heat pumps deliver compared to gas boilers. A restored cast iron radiator in a heat pump-ready home is not a compromise. It is the correct specification for the heating system direction the market is moving toward.
Conclusion
Radiator restoration in a middle class home is rarely the complicated project it looks like from the outside. The diagnosis takes twenty minutes and a radiator key. The surface work takes a weekend. The internal system cleaning the powerflush, the magnetic filter, the corrosion inhibitor takes a morning with a Gas Safe engineer and produces heating performance improvements that a new panel radiator cannot replicate because it addresses the whole circuit rather than one component of it.
The cast iron radiator that looks beyond saving almost never is. What it usually needs is someone willing to bleed it, assess it honestly, strip it back to bare metal, and put it back together with the right primer, the right heat-resistant paint, and correctly specified valves. That sequence produces a radiator that will outlast the person restoring it which is a different kind of value proposition than anything available in a flat-pack heating catalogue.
At middleclasshomes, the position on restoration versus replacement follows the same logic that runs through every home improvement decision on the site: replace when restoration cannot deliver the required outcome, and not before. For cast iron radiators in period properties, that threshold is higher than most heating engineers initially suggest and lower than most homeowners initially fear. The 95% lower carbon footprint of a refurbished radiator versus a new one, the £1,000 annual energy saving potential from a properly bled and balanced system, and the architectural value of a period radiator correctly finished in Little Greene or Farrow and Ball these are not marginal considerations. They are the reasons a comprehensive guide radiator restoration middleclasshomes exists as a resource in the first place.
Frequently Asked Questions (FAQ’s)
Radiator restoration usually includes checking for leaks and sludge, removing old paint and rust, applying a suitable metal primer, repainting with heat-resistant paint, and replacing worn valves if needed. The radiator should also be bled and the heating system balanced after reinstallation.
Restoration usually makes sense when the radiator is structurally sound and the problems are limited to rust, old paint, sludge, or faulty valves. Replacement becomes the safer choice when the radiator body itself is leaking or corrosion has weakened the metal.
A basic DIY restoration can cost roughly £50 to £120 per radiator, while professional refurbishment costs more depending on cleaning, repairs, size, and finish. A reproduction cast iron replacement can cost several hundred pounds, so restoring an original radiator may be more economical in a period home.
Cold areas near the bottom of the radiator, uneven heating, or dark water released during bleeding can indicate magnetite and sludge buildup. A chemical flush or professional powerflush may be needed if the problem affects several radiators across the heating system.
Yes, cast iron radiators can suit lower-temperature heating systems because their large surface area and thermal mass allow them to release heat steadily. Their actual suitability still depends on radiator size, room heat loss, and the operating temperature of the proposed heat pump system.
